Flights from Babadağ end at Belcekız. The areas are narrow and busy, so you plan the approach while you are still high.
Last updated 2026-09-01
Almost every flight from Babadağ ends at Belcekız. The landing areas are at
sea level, lined up along the shore on the seaward side of the boulevard.
They are narrow and long, surrounded by trees and holidaymakers, and on busy
days a large number of wings approach at the same time. Those three things
together are why you plan your approach while you are still high.
The main landing zone of Ölüdeniz. It is not one large field but several
separate stone and grass areas lined up along the shore, just on the sea
side of the boulevard. The areas are narrow and long, so the approach is
flown parallel to the coast and the final runs along a narrow line.
Location Where the areas are
Sea side of the boulevard, lined up along the shore
Altitude Above sea level
Sea level
Surface Landing ground
Stone and grass. Narrow and long, with trees between them
Prevailing wind What to expect
From the sea towards the land
Approach direction The final leg
West to east
Surroundings What is around
Open ground and beach on the sea side, boulevard, hotels and trees on the land side
The landing pattern
At Belcekız the approach is set up on the land side of the landing areas,
parallel to the shore. Because the wind comes off the sea, this leg is flown
with a crosswind, and the turn into wind is left until the last moment as you
enter the area.
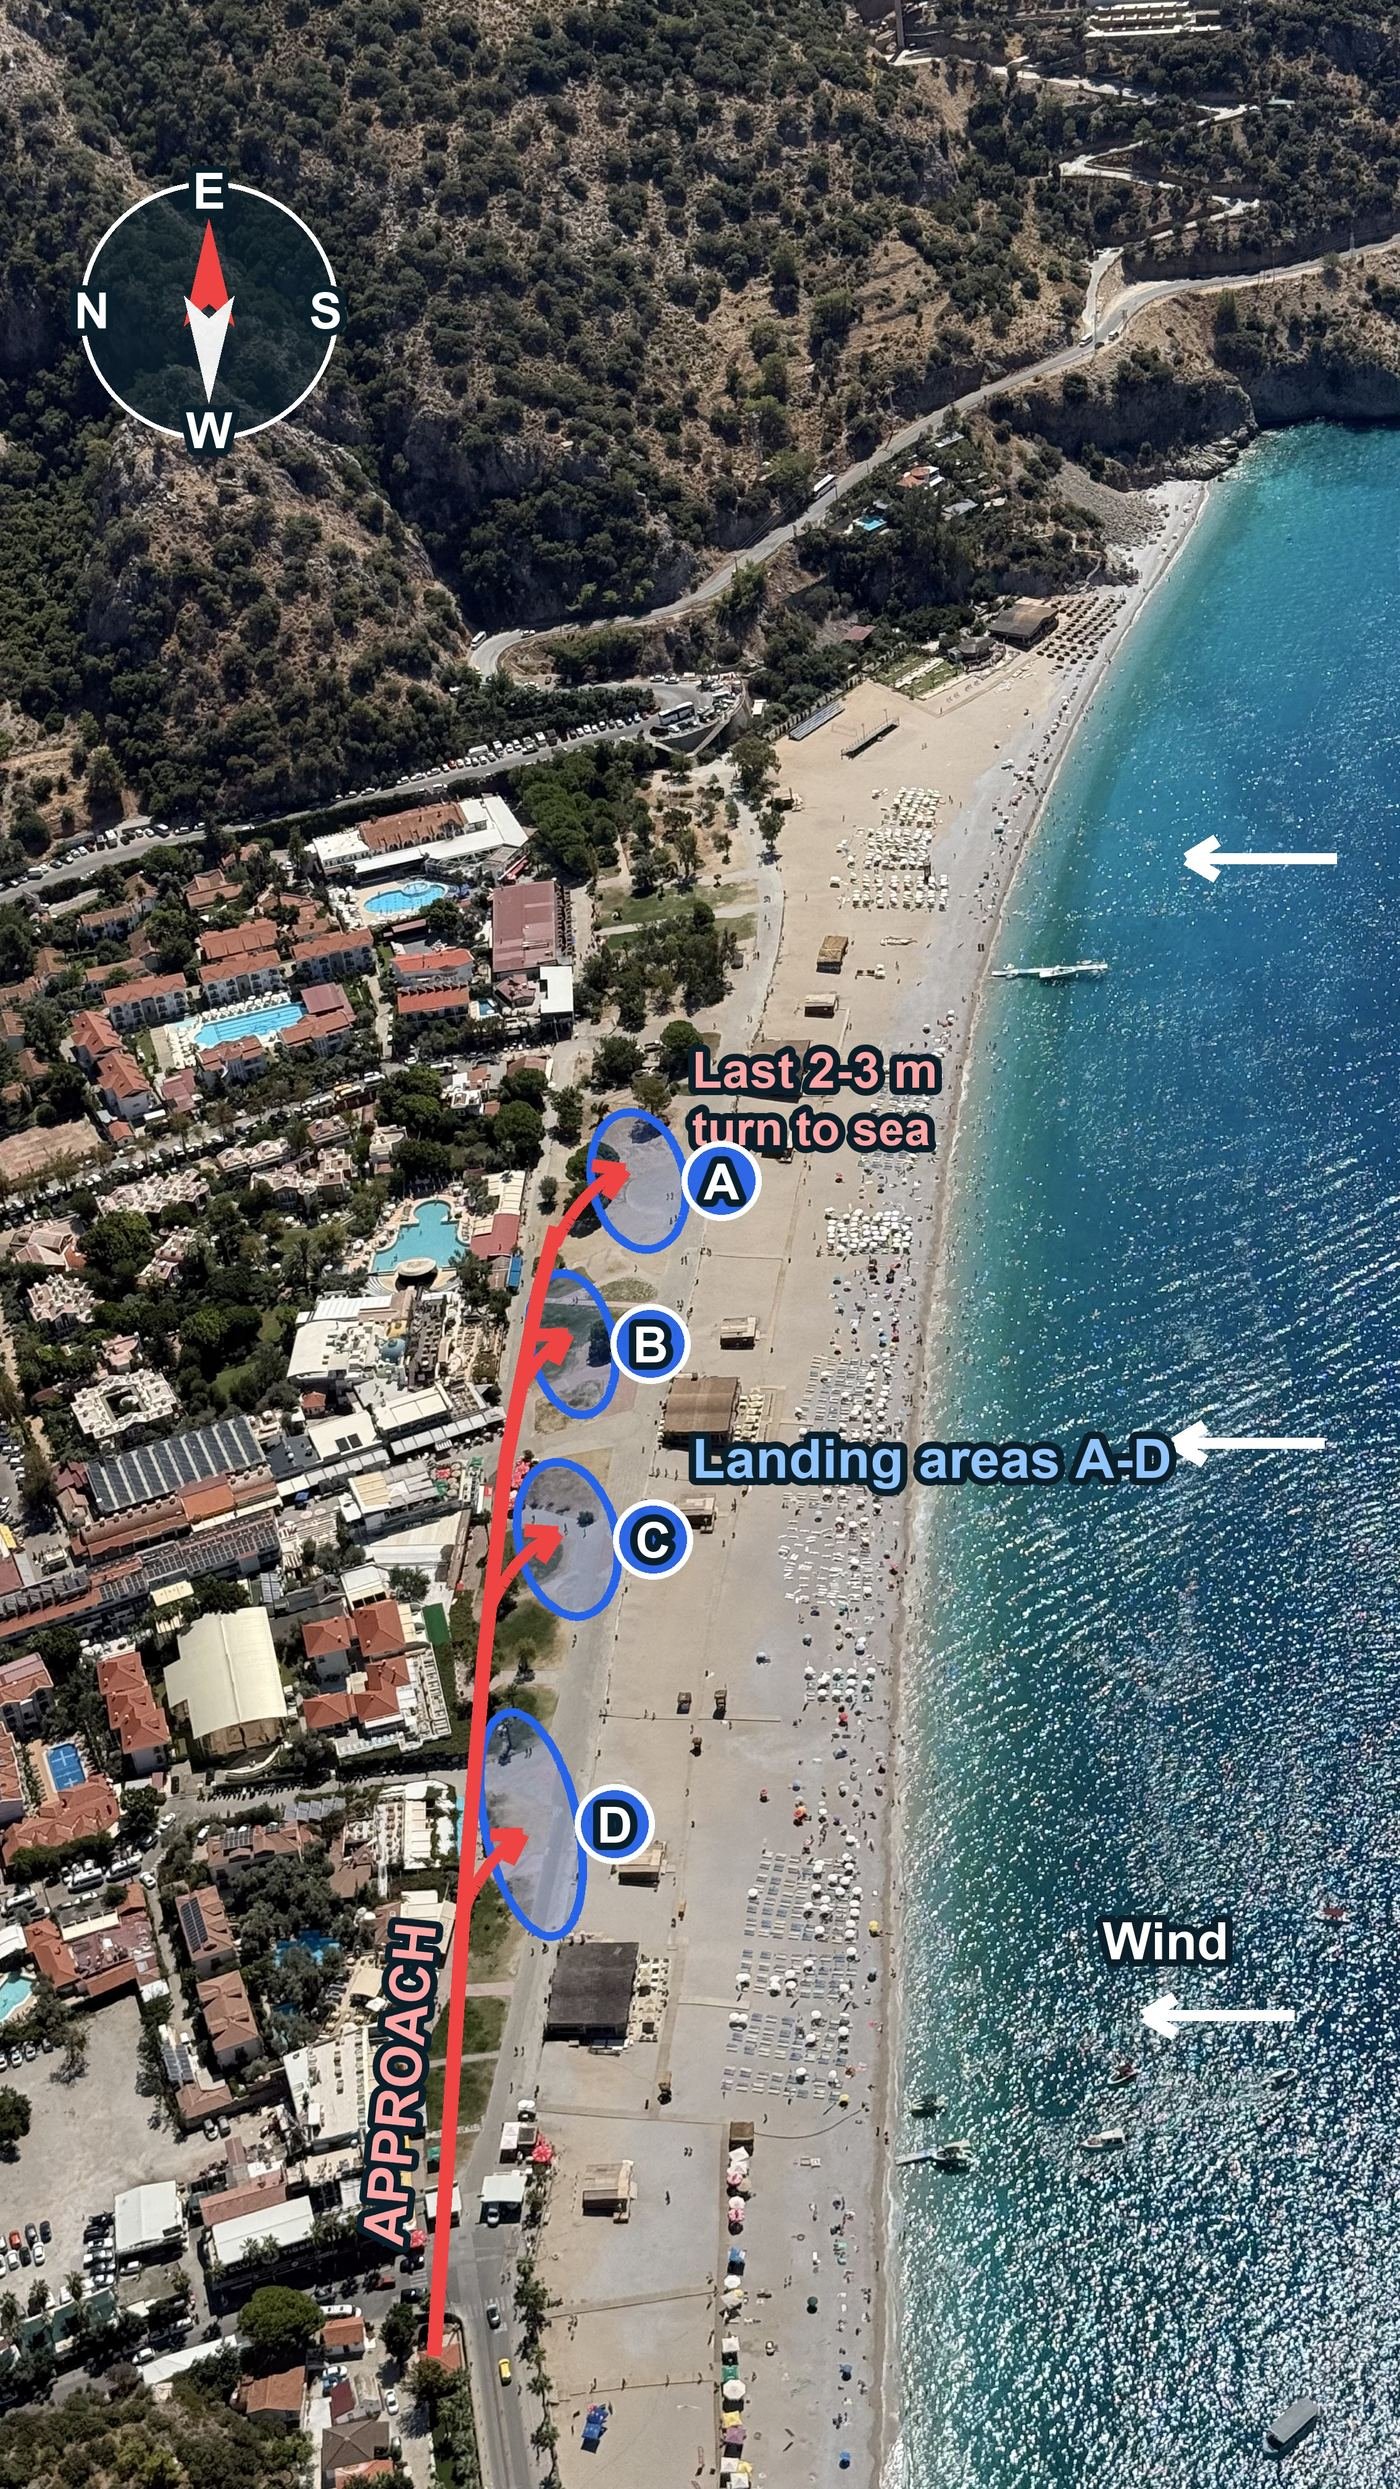
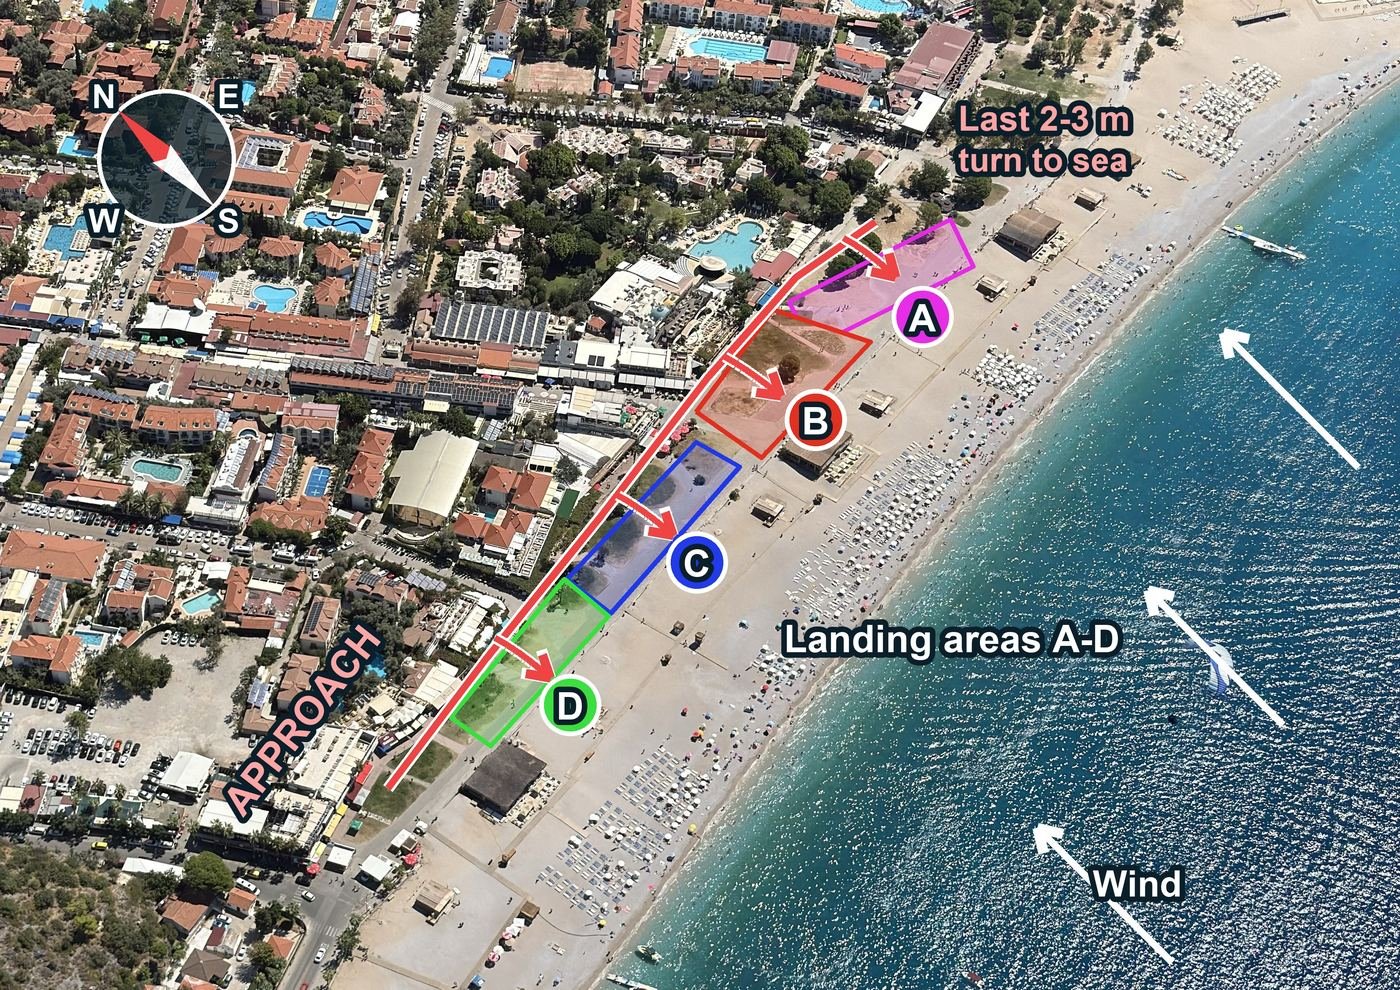
Belcekız landing areas and approach plan. Blue ellipses are the landing
areas, the red line is the approach and the arrows leaving it are the turn
towards the sea in the last two or three metres. White arrows show the
wind. In the photograph the top is east, the bottom is west and the sea is
on the right.
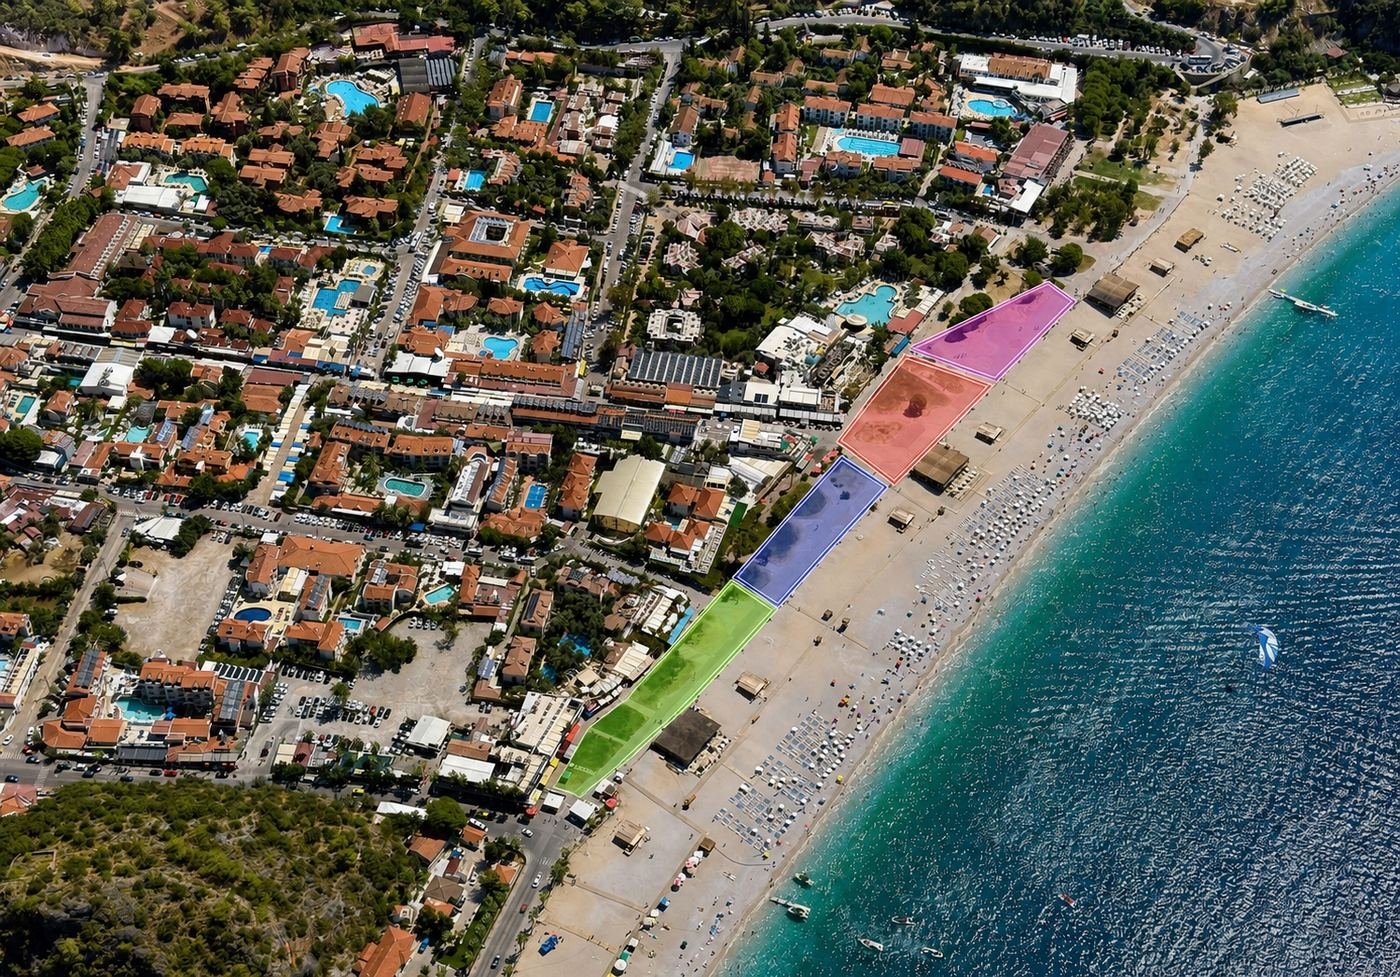
The boundaries of the areas. Colours match the other images: pink is A, red
is B, blue is C and green is D. This frame shows their real size and the
distance between them. All of them sit in the strip between the boulevard
and the beach, with their long sides parallel to the shore.
Area codes
The landing areas are lettered throughout this guide. A is
the furthest northeast and D the furthest southwest. Because
the approach is flown from west to east, a pilot passes them in the order
D, C, B, A, so D is the first one you reach.
Code
Position
Order on approach
A
Furthest northeast
Fourth, the furthest away
B
Between A and C
Third
C
Between B and D
Second
D
Furthest southwest
First, the nearest
The size of each area and how busy it is change through the day. Decide which
one you are landing in while you are still on the approach line, and do not
change your mind once you are over them.
The same plan from an angle that shows the whole shoreline. How the areas
line up, and the fact that the approach runs along their land side, is
clearer in this frame. The top is northeast and the sea is on the right.
The legs of the pattern
Approach. You descend parallel to the shore, from east to
west, flying along the land side of the areas. On this leg the landing
areas and the traffic in them stay on your right.
Choosing your area. You decide which area you are landing
in while you are on this line. The areas are narrow, so make sure the one
you commit to is clear.
The last two or three metres. As you enter your chosen
area you turn towards the sea. Because the wind comes off the sea, this
turn puts you into wind at the last moment, drops your ground speed and
lets you land under control.
Timing the turn to the sea
The whole pattern is built around leaving the turn into wind until last.
Turn too early and you fly a long final crabbing into wind, drifting out
over the crowded seaward side. Turn too late and you touch down in a
crosswind. This is the part of a Belcekız landing that takes the most
practice. On your first flight it is safer to watch it from above than to
try it straight away.
Discipline on the approach line
Do not drift around undecided on the approach line. Choose your area early
and make your intention obvious. On busy days there are other pilots behind
you on the same line, and an unexpected turn ruins their plan too.
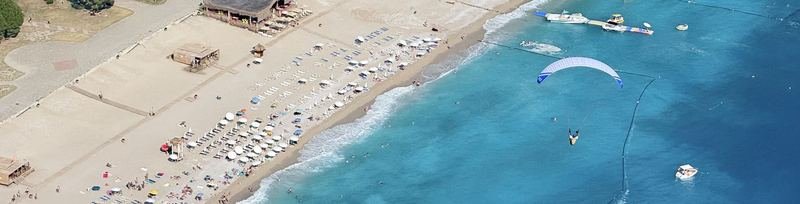
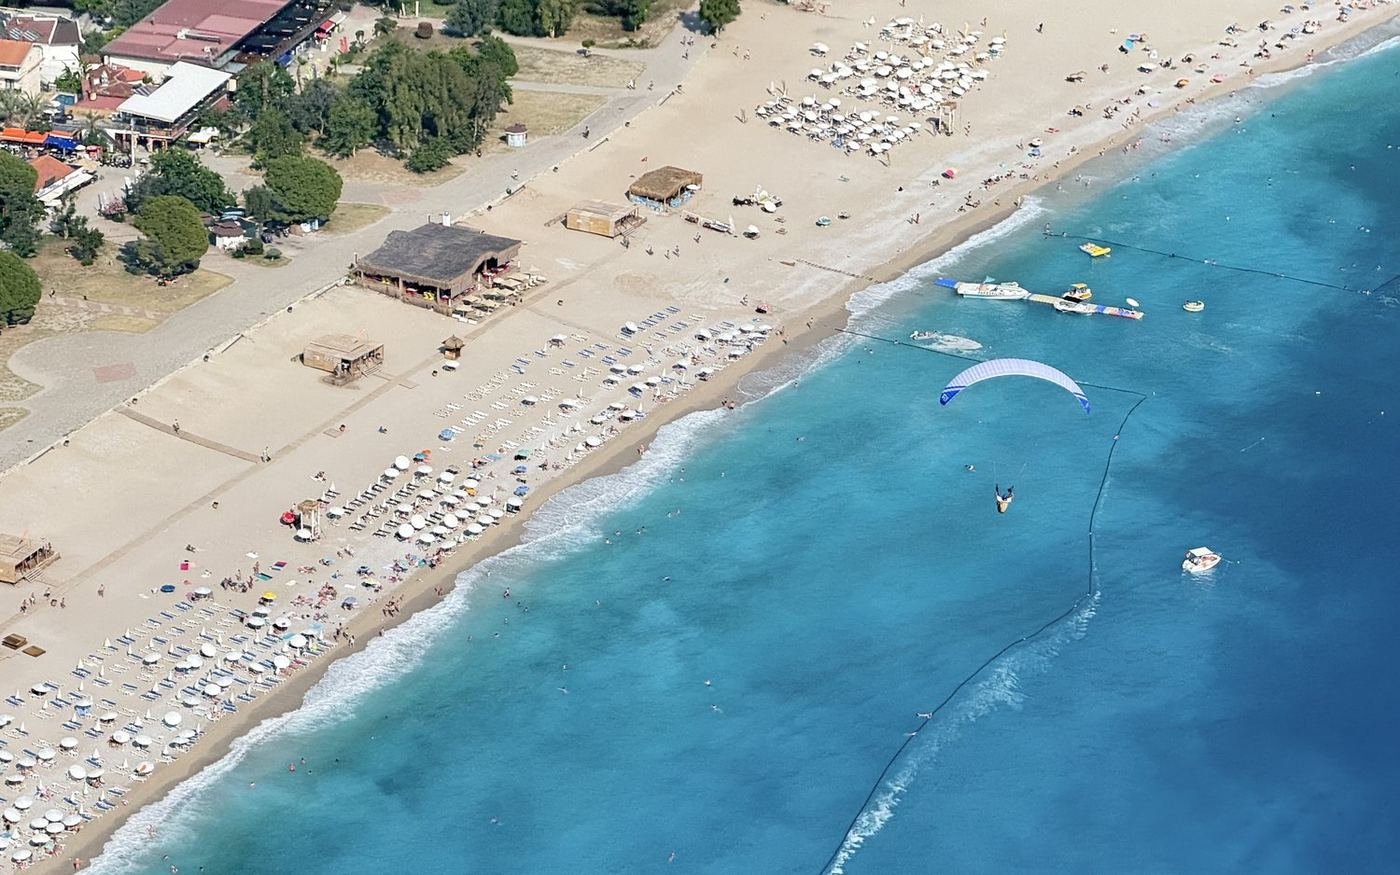
A wing on approach to Belcekız. The rows of sunbeds and how busy the area
gets are both visible in this frame.
What to watch for
Holidaymakers. The open ground and beach on the seaward
side are full of sunbeds, people walking and stalls. When you make your
turn towards the sea, do not let yourself drift over the crowd.
Trees and buildings on the land side. There are trees
between and behind the areas, and the boulevard and buildings just beyond.
A final that sags towards the land side is not safe.
Traffic. At peak hours many tandems approach at once and
the areas are limited. Decide early and make your intention clear.
The wind changes through the day. The sea breeze builds as
the day goes on. The approach you flew in the morning may not be the same
one in the afternoon.
SIV, acro and speed fly zones
Areas A to D are for normal free flight landings only. There is a separate
SIV and acro box over the water, and speed fly wings use their own approach
and landing area at the southeast end of the shore. Stay out of both. The
boundaries are on the
airspace page.
Alternative landings
Decide the moment you realise you will not make Belcekız. The following are
the alternatives used in the area.
Area
Distance and direction
Notes
Butterfly Valley
About 7 km southeast
Land at the east end of the beach, away from the restaurant.
Do not land in the fields, there is a risk of a fine.
Kabak
About 10 km
A small beach. The area is tight, so plan your approach early.
Committing to an alternative
Make the decision to head for an alternative while you still have height.
Testing whether you can just reach Belcekız means losing both the main
landing and the alternative.